terminal折腾记之windows篇
Silas Shen
4月 08, 2020
最近把开发环境迁移到了 windows 上,久违的 windows 还是给我带来了不少的惊喜。简单的折腾[1]之后,终端的使用体验已经非常接近 Mac 了。
这篇文章作为之前写过的一篇文章——《terminal折腾记之Mac篇》的姊妹篇。实现思路上大都相似。
准备
配置
terminal 配置
profiles.json 结构
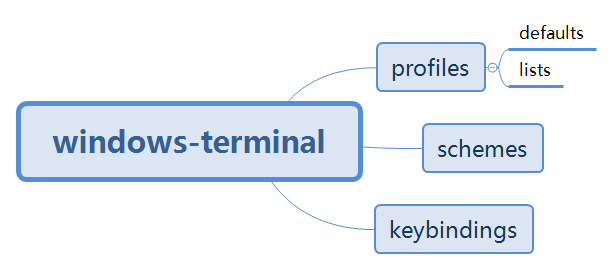
复制 iTrem 上的颜色主题,导入到 schemes 数组中。然后在 list 中,使用这个键值 "colorScheme":"lovelace",生效主题颜色。当然你也可以把它写到 defaults 中,这样就会覆盖 list 中配置的所有终端。
powershell 配置
- 安装 oh-my-posh
# 安装命令
Install-Module posh-git -Scope CurrentUser
Install-Module oh-my-posh -Scope CurrentUser
- 下载 powerline font
- 配置 powershell_profile.ps1
# 如果之前没有配置文件,就新建一个 PowerShell 配置文件
if (!(Test-Path -Path $PROFILE )) { New-Item -Type File -Path $PROFILE -Force }
# 打开配置文件
vi $PROFILE
# 添加内容
Import-Module posh-git
Import-Module oh-my-posh
# 设置主题
Set-Theme Paradox
- 在powershell中使用vim
# 使用git内置的vim
vs code 配置
如果之前在 vs code 中使用等宽字体的话,打开终端会发现命令提示符出现乱码。这时候要把终端的字体设为powerline,就像这样:
"terminal.integrated.fontFamily": "Meslo LG M(你使用的字体) for Powerline"
备份
现在,我们来整理一下整个改造终端的过程更改了哪些文件:
- profiles.json
- powershell_profile.ps1
- setting.json
备份了这三个文件,就能在任何一台windows设备上还原有颜同时又很强大的终端了。
最后
其实到了这里,只能说是实现 windows 下 terminal 的基本改造。还有很多的部分没有去折腾,比如:
- 快捷键的绑定
- WSL相关
- 编写自己的主题
- tricks and tips
更多的细节以及使用技巧,可以在官方文档中找到。
系统环境须在 Windows 10 (build
1903)以上 ↩